Monday, July 9, 2012

Watermelon Salsa


Summer is in full swing here in Georgia! We had a record breaking heat wave a few weeks ago! It's finally starting to cool off a bit, but we'll see how long that lasts.
When I think of summer, I think of salsa. Lately, we have been salsa maniac's. One of our favorite summer salsa's is Watermelon Salsa! It is so refreshing and is a great snack for an afternoon by the pool!

Watermelon Salsa

1/2 medium white onion, chopped into 1/4-inch pieces
Hot green chiles to taste (usually 1 to 2 serranos or 1 small jalapeño), stemmed, seeded (if you wish) and finely chopped
1 3/4 cups of cubed watermelon  (1/4 cubes)
2 to 3 tablespoons (loosely packed) chopped fresh cilantro (thick bottom stems cut off)
About 2 tablespoons fresh lime juice

Salt to taste

Sunday, June 3, 2012

BBLTA. Whats that you say?


Over the years the BLT, in my opinion, has gotten a boring and basic stereotype. So how can you make it more indulgent? Well, here we go... Let's double the amount of bacon and candy it in the oven. That just makes the bacon taste that much better! Add a little avocado in the middle of the layers of bacon. It adds a nice creamy factor. We also stepped up the bread as well and got fresh sour dough from Holeman and Finch bakery.

Out of the grocery bag:
  • Peppered bacon  12 slices (about 3/4lb)
  • Brown sugar
  • 2 medium tomatoes, sliced to desired thickness
  • 2 avocados
  • lettuce (we used red tipped lettuce)
  • Mayo
  • Sour dough bread
Candy the Bacon

Set your oven to 475. Place a cooling rack or grilling rack on a cookie sheet. Lay out the strips of bacon and top with brown sugar (don't worry about over coating them, the extra sugar will melt down and drip off.) Bake until crispy, about 25 min.

The Assembly:

Toast the bread in butter in a saute' pan on one side. This makes it so rich and sumptuous. Put alittle mayo on the base, then add the bacon, avocado, then bacon again. Salt and pepper the tomatoes then load them on followed by the lettuce and the top layer of bread. Voila! the most amazing BBLTA!

Enjoy!

Friday, June 1, 2012

Authentico!

Well since we moved from California we have had a hard time finding real Mexican food. You know the little tacos topped with onion, cilantro and the fresh salsa whether it be the super hot red chile, or the tangy tomatillo kind.  Where we live, they are all the red light, as I call them, Mexican joints that just warm up prepared food.  The way I look at it, Mexican food should be the freshest tasting food you can eat.  So I have been working on perfecting my version of the chicken/steak taco.  After eating at every mainstream, hole in the wall, taco truck, general store, really any place that sells tacos that I could find, when we lived in Cali, I put together my favorite flavors from them all.  So lets get those taste buds going...


Tomatillo Salsa (Rick Bayless)
 
8 ounces (3 to 4 medium) tomatillos, husked and rinsed
Fresh hot green chiles to taste (1 or 2 serranos or 1 jalapenos), stemmed
2 large garlic cloves, peeled
6 sprigs of fresh cilantro (thick bottom stems cut off), roughly chopped
1/4 small white onion, finely chopped
Salt


Directions

Roast the tomatillos, chile(s) and garlic on a rimmed baking sheet 4 inches below a very hot broiler, until blotchy black and softening (they’ll be turning from lime green to olive, with charred spots. Don't worry), about 5 minutes. Flip them over and roast the other side. Cool, then transfer everything to a blender, including all the delicious juice the tomatillos have exuded during roasting. Add the cilantro and 1/4 cup water, then blend to a coarse puree. Scoop into a serving dish. Rinse the onion under cold water, then shake to remove excess moisture. Stir into the salsa and season with salt, usually 1/2 teaspoon.

The Meat:  Chicken or Steak

1 lb of your choice of meat
Cumin
Spicy Mexican chili powder
Salt
Pepper

Season the meat generously with all the ingredients.  Cook chicken completely and steak to preferred doneness.  The grill works wonders or if you don't have a grill or it's the wrong season, a grill pan works great too!

Chop up meat finely

The assembly:  choose your favorite tortillas (corn,flour). I like the small corn or the fajita size flour.  Top with cilantro and white onion, cover with the super yummy salsa and enjoy!  Oh yeah the Wifey loves them with fresh guacamole.

Monday, May 14, 2012

Road trip recipes ..... well sorta

So this is my (Tyson) first try at a post.  Pardon the incorrect spelling and grammar, I have been told it isn't the best.  We came across this recipe in the Tupelo Honey Cafe cook book we got as a gift for Christmas.  The reason we got the book is my parents bought year passes to the Biltmore Estate in Asheville N.C. and sent pretty much all of my brothers to go visit as a gift.  So this got us to Asheville. The other thing is they like to travel by food, basically map out restuarants along their journey.  So this typically affords us good tips on places to eat out of town, not that we travel much.  We got the pleasure to go to the restuarant for breakfast and dinner.  The place has an amazing breakfast menu with sweet potatoe pancakes I would highly suggest.  Although we did not eat this recipe (the pork) we did have some pretty tasty food enough to want to try more, and that brings us to this meal.  Hope you try and enjoy.  Don't be discouraged by the amount of ingredients it was easy to make.


For the pork

1 pork tenderloin (about 1 pound)
12 ounces root beer
½ cup molasses
1 tablespoon canola oil
½ cup Smoked Jalapeño Sauce (recipe follows)
2 cups Apple Salsa (recipe follows)


Cut the tenderloin diagonally into 1-inch-thick slices and set aside. In a medium bowl, combine the root beer and molasses, mixing thoroughly. Pour over the pork loin. Cover and marinate for at least 1 hour (We went overnight).  Heat the canola oil in a large heavy skillet over medium high heat until the oil is 350 degrees on a deep-fat thermometer. Drain and discard the liquid from the pork and place the pork slices in hot oil, searing for about 3 minutes on each side, or until cooked to medium. Serve immediately drizzled with the jalapeño sauce and topped with the salsa.


Smoked Jalapeño Sauce

We have found this sauce to be good on lots of other things like burgers or chicken. I think the flavors are a great blend of heat and sweet. You can use chipotle peppers in adobe, if you don’t smoke your own peppers. Thats what we did and is excellent and easy.  But try smoking your own if you have time.  The recipe for that is below if you're feeling adventerous.

1 smoked Jalapeno (we used 1 pepper from a can of chipotle peppers in adobo)
¼ cup orange marmalade
1/3 cup tupelo honey or what ever honey you like
½ cup freshly squeezed orange juice
½ cup V8 juice
1½ teaspoons chili powder
1½ teaspoons ground cumin
1½ teaspoons roasted garlic purée
¾ teaspoons ground coriander
1/8 teaspoon sea salt
1½ teaspoons cornstarch
1 tablespoon water
3 tablespoons freshly squeezed lime juice
1½ teaspoons minced fresh cilantro


Combine the smoked jalapeño, marmalade, honey, orange juice, V8 juice, chili powder, cumin, garlic purée, coriander and salt in a large saucepan and bring to a boil over high heat. Combine the cornstarch and water in a small bowl and stir thoroughly. Decrease the heat to medium and add the cornstarch mixture to the saucepan with a whisk. Cook for 2 minutes, decrease the heat to low, and cook for about 5 minutes longer, or until the mixture coats the back of a spoon. Remove from heat and strain the sauce through a fine-mesh sieve. Purée the cooked jalapeño in a food processor and add back to the sauce. Add the lime juice and cilantro. Refrigerate in an airtight container for up to 3 weeks. Makes 1½ cups.


Smoked Jalapeños

To make the jalapeños, put 2 cups hickory chips in the bottom of a 4-inch deep heavy roasting pan. Cover with water and let sit for 5 minutes. Drain the water and cover the chips with aluminum foil. Place 4 whole jalapeño peppers on the foil, cover the pan tightly with additional foil, and put in a 450 degree oven for about 10 minutes. (The foil will puff up like you’re making Jiffy Pop popcorn.) Turn the oven down to 250 degrees and cook for 20 to 20 minutes longer, until the peppers are slightly browned. Allow the peppers to cool before removing the seeds and membranes.* Store peppers in refrigerator. (The same method may be made for smoking tomatoes, by coring tomatoes and scoring the tops and bottoms with an "x" using a sharp paring knife.) 


Apple Salsa

2 Granny Smith apples, diced
1 medium poblano pepper, seeded and diced
1 large red bell pepper, seeded and diced
½ large sweet onion (such as Vidalia), diced
2 tablespoons tupelo honey or what ever honey you like
½ teaspoon sea salt
1/8 teaspoon freshly ground black pepper
1 tablespoon minced fresh parsley


Combine the apples, peppers and onion in large bowl and add the honey, salt, pepper and parsley. Serve immediately or refrigerate in an airtight container for up to 2 days. Makes 3 cups.


We served with mashed sweet potatoes, it would also be good with Tupelo's goat cheese grits.

Sunday, May 6, 2012

Just for the Halibut

This meal was soooo yummy and easy to throw together, AND didn't even cost us a penny! Don't you love when that happens! God is too good to us! Tyson's parents wanted us to try the Halibut from Whole Foods, so they bought us some and brought it over for us. They also brought over some delicious looking (and tasting) asparagus. Elijah was especially excited about the asparagus and couldn't wait for dinner! His parents also went to Holeman and Finch Bread Company recently and brought us back some delicious bread. The pieces of fish were huge, so our original plan was to make fish tacos with what we didn't use the first night, but we didn't get to it because we went out on our friend's houseboat for the weekend. Maybe another time though... I was looking forward to some delicious Halibut tacos!

I will not eat fish that tastes like the ocean. This did not taste "fishy" at all and was so flaky, buttery and moist.

We used 6-8oz Halibut Filets. Make sure to dry them really well before cooking.
Heat about 2 tablespoons of oil in a pan. Sear the fish, skin side down, for about 4 minutes and 3-4 minutes on the other side. We topped it with fresh Thyme (from our little herb garden. ;) ) during those last few minutes of cooking and scooped a little bit of the oil from the pan onto the top of the herbs and fish.

Hope you all enjoy!

Thursday, April 12, 2012

Nothing Fancy


The weather has been so nice here lately! We have been spending alot of time outside which means having picnic dinners! The boys love this and Elijah asks to eat outside almost every night! Tyson's parents bought him a grill for his birthday this year since our old grill caught on fire at our Fourth of July party two years ago! We have missed having a grill and have been grilling out as much as possible! The other night we had burgers. Now of course, these weren't your ordinary cheese burgers with ketchup, mustard and tomatoes. Nope. We like to take things up a notch around here! These burgers had pepperjack cheese, jalapenos, onion and topped with cilantro. See what I mean about "taking it up a notch" ;) They were so good! We even had them again, a few days later! We served them with cantaloupe and tater tots. Yes, I said tater tots! We love us some tots around here!


Take It Up A Notch Burgers
  • Ground Beef (we use 80/20 for burgers)
  • 1 Jalapeno, sliced and seeds removed (or if you want it extra spicy leave some or all the seeds)
  • Yellow Onion, sliced into half moons
  • Cilantro Leaves
  • Mayo
  • Hamburger buns
The method that we like to use to form or burgers is to take a chunk of meat and squish it with the bottom of a plate onto some wax paper. Tyson finds that the less that you work the piece of meat, the more tender it will be. He is also an au-natural kind of guy when it comes to seasoning the burgers. Just sea salt and pepper. And be generous with the salt.

Grill the burgers to your desired temperature and top with cheese at the last minute and remove when it's just melted. Let the burgers rest for about 4 minutes. While the burgers are resting, pop the buns on the grill for a few seconds to lightly toast them.

Assembly time! Lightly coat the bottom bun with mayo. Next up is the burger. Then top with the sliced jalapenos, onions, and cilantro. Put the top bun on top and ENJOY!!

The cantaloupe went pretty well with this burger. It was nice and refreshing when the burger got too spicy.


Monday, March 26, 2012

Blackened Mahi Mahi

Every week, we make a meal plan. I'm (Crystal) usually in charge of doing the meal plan every week, but for no particular reason, Tyson made one that week. He pulled up the sales ad for Kroger and went about making the list off of things that were on sale. My brain just doesn't work that way. After that week, I told Tyson he was in charge of doing the meal planning from now on because, 1) we came in way under our budget for that week and 2) we had some good eats that week! That week at Kroger, avocados and mango's were both $10 for $10 and Mahi Mahi was also on sale. I would have never thought to put any of that together, but that's why I'm not the cook ;) I do the baking. We follow the rules!

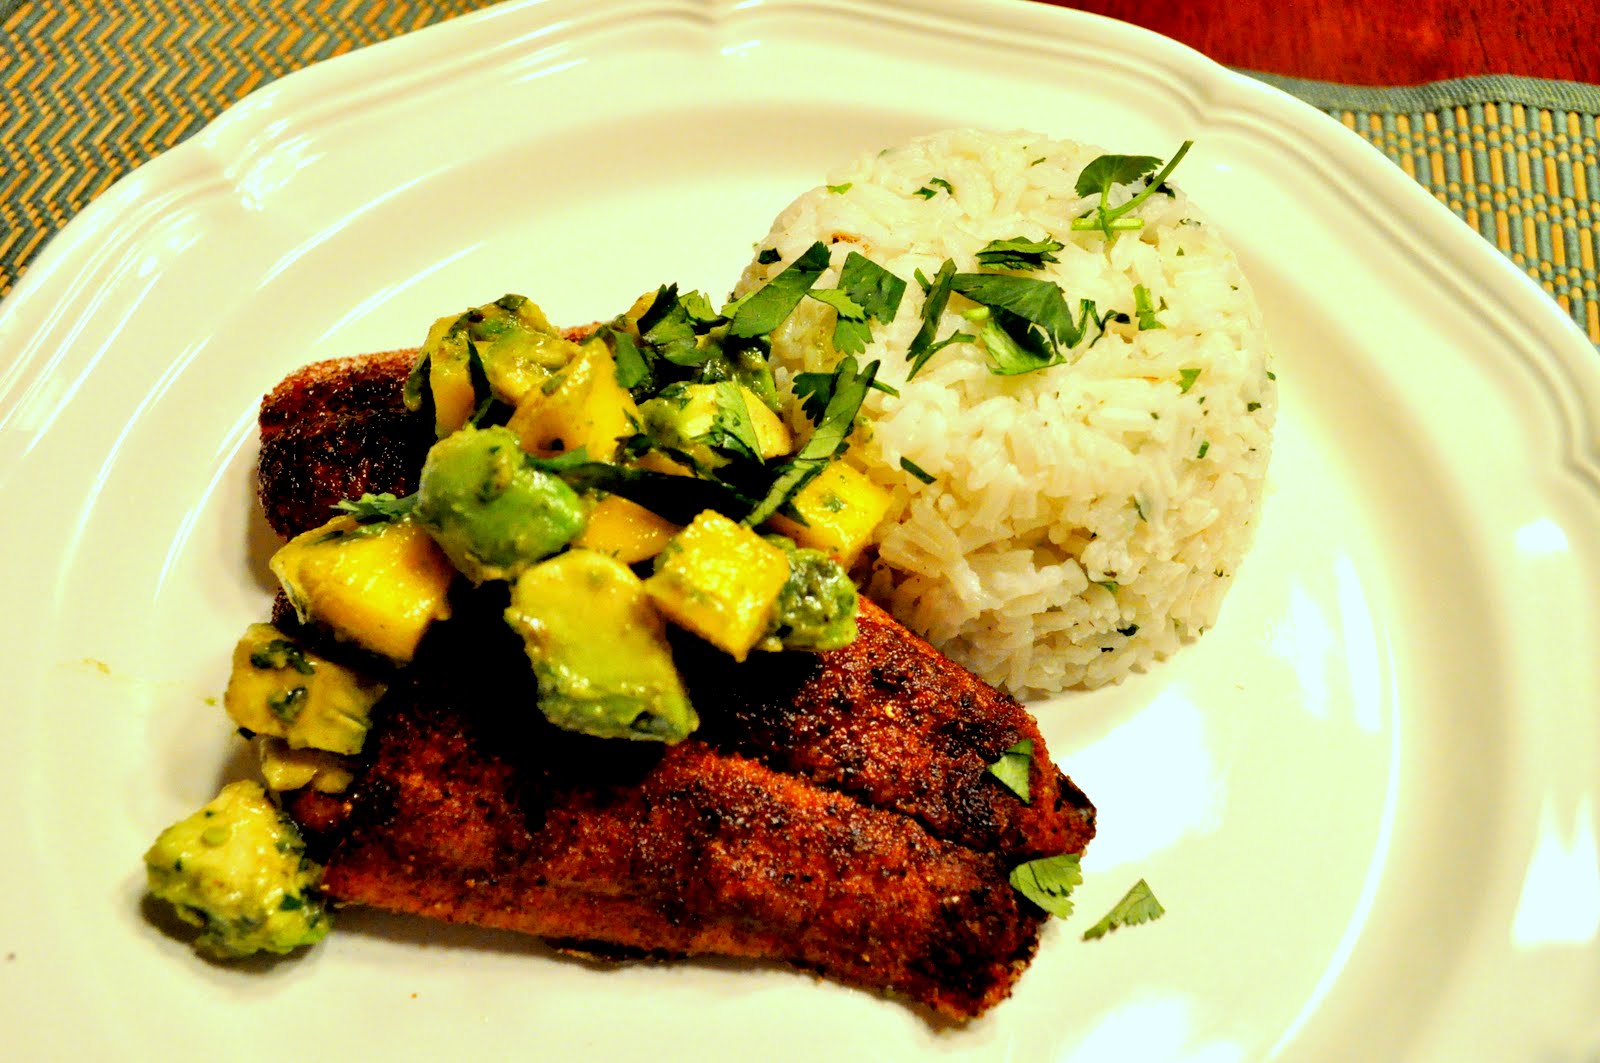
So, all that being said, we made Blackened Mahi Mahi with an Avocado Mango Salsa and Cilantro Lime Rice.


For the Mahi Mahi, we used the blackened seasoning from Big Daddy. It consists of:

  • 3 tablespoons smoked paprika
  • 1 teaspoon salt
  • 1 tablespoon onion powder
  • 1 teaspoon ground black pepper
  • 1 teaspoon cayenne pepper
  • 1 teaspoon dried ground thyme
  • 1 teaspoon dried oregano
  • 1/2 teaspoon garlic powder

  • Tyson mixed everything together and coated the fish. He then seared it in a cast iron pan, skin side down, in a little bit of olive oil. Our specific fish only took about 2 minutes on the skin side and about a minute and a half on the other side but it could vary depending on the thickness of the fish.

    You could use this on other types of fish as well, salmon, tilapia, ect...

    Mr. Bobby Flay lent us the recipe for the Avocado Mango Salsa. Ok, so he didn't personally give it to us but foodnetwork did. ;) It's hidden inside of another recipe. Here are the ingredients:

    • 1 avocado
    • 1 mango
    • 2 tablespoons olive oil
    • 1 tablespoon red wine vinegar
    • 1/2 teaspoon cumin
    • 2 tablespoons of chopped cilantro
    • salt and pepper to taste
    To make the salsa: Put the avocado and mango in a large bowl. Add 2 tablespoons olive oil, 1 tablespoon red wine vinegar, 1/2 teaspoon cumin, cilantro, and salt and pepper. Toss gently to combine. Spoon the mango mixture across the top of the Mahi Mahi and garnish with some more fresh cilantro.

    For the rice, we used a recipe that we found a long time ago, that claims to be Chipotle's cilantro lime rice. Who knows if it really is, but it tastes pretty similar and it's super good! We follow this recipe exactly how is says...including the no peeking part! We also use long grain white rice because it's cheaper than basmati. :)

    • 1 tbsp oil (canola/vegetable)
    • 2 tsp fresh cilantro, chopped fine
    • 1 fresh key lime (or ½ regular lime)
    • ½ tsp salt (kosher or sea salt)
    • 1 cup long grain white rice (or basmati, if you can bear the funky smell)
    • 2 cups water
    • Sautee the rice in oil until almost translucent (as if you are making a risotto).
    Add water, bring to a boil.
    As soon as the water begins to boil, turn the heat down low.
    Simmer, covered for 15-20 minutes, or until all water is absorbed.
    Turn off heat. DON'T PEEK. LEAVE IT COVERED for 30 minutes (this is the "steaming" part.... Chipotle steams rice every hour). This is what makes the rice fluffy. You won’t be happy with yourself if you don’t do this. Be patient. Good things come to those who wait.
    Remove lid, let some of the steam out. It may be helpful to transfer rice into a mixing bowl for the next step.
    Mix salt and juice of key lime together until salt is dissolved.
    Pour it over rice, fluff with a fork.
    Sprinkle in cilantro, and toss well to evenly coat with cilantro and lime mixture.
     
    This meal was a super budget friendly meal! We figured it only cost about $7 to feed the both of us! Let us know if you give this recipe a try!

    Thursday, March 22, 2012

    Dinner For Two...And No Tip

    This year for Valentine's Day, we enjoyed a steak house dinner at our own table. We are alittle bit picky when it comes to going out for a special dinner and knew that it would not be in the budget to go out and get what we really wanted, so we made it for ourselves. And let me tell you, it was so delicious. I'm pretty sure it was just as good or better than some steaks we have paid money for...and OH, did I mention it only cost us about a quarter of the price!


    Here's what was on the menu:
    • Coffee Encrusted Filet Mignon
    • Honey Glazed Carrots (adapted from here)
    • Artichoke Risotto
    • Bacon Fried Green Beans (from Rachael Ray)
    • Chocolate Covered Strawberries

    Filet Mignon

    The Crust
    1 Tbls of coffee grounds
    1 Tbls of sugar
    1/2 Tbls sea salt
    1tsp of fresh ground pepper
    1/2 tsp of garlic powder

    Mix everything together on a small plate. Then dip each side of the filet in the mixture. Set aside.

    Heat a cast iron pan on high heat and also pre-heat your oven to 500 degrees. Dizzle about 1 tablespoon of olive oil in the pan and sear one side of the filet for about 3-4 minutes. Then flip the filet and immediately place the whole pan into the oven.  Cook until desired done-ness. (if that's even a word. lol)

    For a 2 inch filet cook for 4-5 minutes for a warm rare.

    We eat our filets rare, but a meat thermometer will help if you want it more well done.

    Honey Glazed Carrots

  • Salt
  • 1 pound baby carrots
  • 2 tablespoons butter
  • 2 tablespoons honey
  • 1 tablespoon lemon juice
  • Freshly ground black pepper

  • In a medium saucepan, bring water to a boil. Add salt and then carrots and cook until tender, 5 to 6 minutes. Drain the carrots and add back to pan with butter, honey and lemon juice. Cook until a glaze coats the carrots, 5 minutes. Season with salt and pepper.

    Artichoke Risotto

    2 cup of Arborio rice
    4 tbls of olive oil
    4 tbls of butter
    1 cup chopped onion
    About 4-5 cups of chicken broth
    Marinated artichoke hearts and a little bit of the juice (add as many as you'd like)
    1 cup of white wine
    1/2 cup of parmesan cheese

    Put the chicken broth in a medium saucepan and warm over low heat.

    In a large skillet on medium high heat, add the olive oil and butter. When the butter is melted add the onions and carmelize. Then add the rice and cook for about 2 minutes, stirring frequently. Don't burn the rice! Deglaze the pan with one cup of white wine and cook until about 1 tablespoon of liquid is left. Gradually stir in the broth 1 cup at a time, cooking and stirring until liquid is absorbed before adding the next cup. When the rice is starting to become tender and you add your last cup of broth, add the artichoke hearts. When the rice is fully cooked and there is only a little bit of liquid left, add the cheese and mix together and remove from heat.

    This makes about 6 cups of rice. We like to cook a bunch so that we have leftovers. It's sooo yummy!

    Bacon Fried Green Beans

    • A drizzle extra-virgin olive oil
    • 6 slices bacon, chopped
    • 1 teaspoon coarse black pepper
    • 1 pound green beans, trimmed
    • 1/4 cup cider or red wine vinegar
    • 2 teaspoons sugar

    In a skillet, heat a drizzle of oil over medium-high heat, when hot add bacon and pepper and cook the bacon until crisp, 5 minutes. Add beans to bacon and cook about 3 to 5, tossing. Season with vinegar and sugar prior to serving.

    Last but not least....


    Chocolate Covered Strawberries

    Strawberries
    Ghirardelli milk & white melting chocolate

    Wash and dry the strawberries. Melt the chocolate according to the package. Dip the strawberries in the chocolate and set on wax paper until hardened. Then take the white chocolate and drizzle over the tops. We put the white chocolate in a pastry bag and cut a tiny hole the drizzle the white chocolate.


    Welcome to the Dinner Bell's!

    Hi there! Welcome to the Dinner Bell's!
    (Thank you Debbye, for the witty blog name! I knew I could count on you ;) )  

    Tyson and I have decided to start this blog as a way to keep a record of the food that we (more like he) makes and to also share some of the recipes. Most nights, Tyson will do the cooking while I try to keep the boys out of the way and entertained. If the conditions are right, I do like to be his "Sous Chef",but those opportunites are few and far between with two hungry toddlers running around waiting for dinner. We have been on a pretty tight grocery budget these days but have still managed to make some pretty tasty food.


    We have been talking about starting this blog for about a month, so we will start by posting about some of the dinner's that we have had these past few weeks and eventually will get caught up to date.

    Stay tuned for our first "real" post...you know, one about yummy food.